

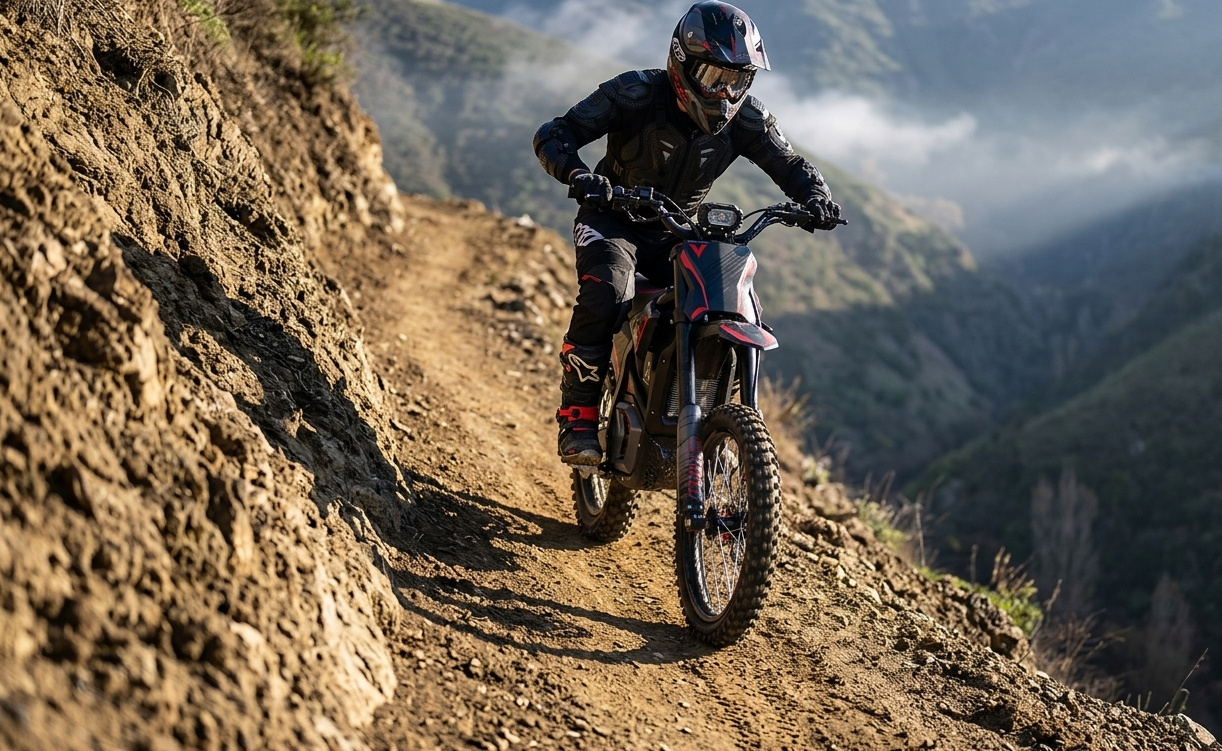
Electric Dirt Bike Off-Camber Trails: Body Position, Traction and Setup
An off-camber trail slopes across the direction of travel, so the tires must generate forward drive while resisting a downhill slide. Braking, steering, acceleration and side-slope support all draw on limited traction, often with little room to stop or place a foot.
A throttle-controlled electric dirt bike can apply motor torque immediately, so abrupt inputs can break rear traction. On models with noticeable regenerative or motor braking, closing the throttle may also add rear-tire drag during the traverse.
There is no universal lean angle, tire pressure, ride mode or fixed body position for every side slope. Read the entire traverse, check the consequence of a downhill slide, choose a predictable setup and turn back when the tread or recovery margin is inadequate.
Quick Answer: Can an Electric Dirt Bike Cross an Off-Camber Trail?
Yes, some off-camber trails are rideable when all four conditions below are met:
- Motorized access is legal for your vehicle class on that specific route.
- The bench supports both tires continuously, with firm soil under the outer edge.
- You can see the exit, and the exit lands on flat, stable ground.
- Worst case, a wheel stepping downhill costs you a dab or a tip. Not a fall down the slope.
Turn back when the surface is loose over hardpack, the outer edge is slumping, the exit is blind or a downhill slide has serious consequences. Inspect on foot only where doing so is safe and permitted, before the front wheel enters the traverse.
Power is not the variable people think it is. A motor carries the bike across a slope. It cannot manufacture lateral support, stopping room, footing, or a recovery route. Judge a stall, a tip and a slide separately from whether the bike moves forward.
Confirm the Route Is Legal Before You Judge the Feature
Quiet operation earns nothing here. An electric dirt bike is a motor vehicle. Routes set aside for hikers, bicycles, or horses stay closed to it no matter how little noise it makes.

Check the Vehicle Class, Not Just the Trail
On National Forest System land, one document governs. The Motor Vehicle Use Map. The MVUM shows which routes are designated open to motorized travel and which vehicle classes are allowed on each, plus seasonal allowances, and routes that do not appear on it are not open to public motor vehicle travel.
Designated routes are not always signed on the ground, so the map is your responsibility to carry. Off-route travel there is prohibited under 36 CFR 261.13, and the map or a current closure order is what defines the route. Other land systems work differently. BLM, state, county and private land each use their own designations, so verify the current rule for the exact route and your exact vehicle class.
Read the class line carefully. "Motorcycles allowed" and "e-bikes allowed" are not the same designation. A 52 mph off-road motorcycle inherits nothing from a Class 1 pedal-assist bicycle. Check current maps, posted signs, seasonal closures, registration, equipment rules.
Never Ride Around a Closed or Failed Bench
A closure is not a suggestion. A collapsed outer edge is not an invitation to build a bypass. No cutting brush. No widening the uphill bank, no dropping below the established tread.
The reason is mechanical, not sentimental. Land managers note that travelling wet routes causes soil erosion and rutting, and that small ruts compound until a route becomes impassable.
Stepping off the tread to dodge a soft section tramples the vegetation holding that edge together, and across enough users, erosion accelerates fast. Some districts now open and close motorized trails on measured soil moisture rather than fixed dates. Legal in April, shut in May. Report serious damage, then ride somewhere else.
The Off-Camber Traction Budget
Tire grip is finite. Every input spends some, and on a side slope one line item is committed before you touch anything. Resisting the pull downhill. Whatever is left pays for drive, braking, and steering. Ask for more of one and the others get less.
That framing beats any technique tip. It is why smooth riders cross sections that stronger riders slide off.
Forward Grip and Lateral Support Are Not the Same Thing
A tire can rotate forward while its contact patch quietly gives up sideways. That is the failure mode that catches people. Wet roots, polished rock, loose shale over hardpack, angled ruts. Each lets the wheel keep spinning while the bike migrates downhill. The rider reads forward motion as control right up until it is not.
Instant Torque and Regen Drag Both Spend Grip
Two electric-specific problems. A sharp throttle opening breaks the rear loose at once, with none of the rev-and-clutch warning a petrol bike gives you. Then the other direction. Regen drag can unsettle or briefly lock the rear the moment you shut off.

Both behaviours change with the selected power mode. Which means the mode you picked in the parking lot is already part of your traction budget.
|
Rider demand |
What it spends grip on |
Lower-risk response |
|
Acceleration |
Rear-tire drive force |
Feed power in progressively, within an approved mode |
|
Braking |
Front and rear deceleration |
Finish the slowing before the entry, on stable ground |
|
Steering |
Lateral force at the contact patch |
Cut the corrections you do not need |
|
Holding the slope |
Constant resistance to downhill drift |
Hold one line, keep inputs steady |
Run the Consequence Gate Before You Enter
Most riders look at an off-camber section and hunt for a line. Better question first. What happens if the line fails? That is the consequence gate. Risk decision, not a skill decision.
Read the Exposure Below the Tread
Look down the slope, not along the trail. Drop-offs, standing timber, exposed rock, water, unstable fill. Anywhere a sliding rider or machine accelerates instead of stopping. If the answer downhill is bad, the quality of your line stops mattering.
Find a Supported Bench, an Open Exit and a Turnaround
Three things. All physical, all confirmed before entry.
- A continuous bench at least a tire wide, firm soil under the outer edge rather than loose fill.
- Sightlines the whole way through, ending on ground you could actually stop on.
- Somewhere to stop or turn around if the traverse narrows. Verified, not assumed.
Then the stop conditions. Turn around if the outer edge is slumping. Or if the surface crumbles under boot pressure, you cannot see the exit, the exposure is past your tolerance, or a fall would mean dragging the bike out of a steep hazard zone. Any one of those. Not a majority vote.
Read the Traverse From the Exit Backward
Pick the exit first, then find the entry that feeds it. Entering high because it looks easier is how riders end up making a sharp, expensive correction near the end. On the section where grip was already thinnest.
Look for the Surface and Water Clues
Scan for transitions, not obstacles. Hardpack into loose shale. Dry dirt into a root cross-cut. Dirt into an angled rock shelf. Each changes lateral grip without changing how the trail looks from a distance.

Water tells you about structure. Active drainage crossing the tread, an undercut outer edge, slumping topsoil, packed organic debris holding moisture. Those say the trail bed itself is moving. Different problem from a slick surface. Wet roots and deep ruts deserve their own techniques and are worth learning separately.
|
Surface clue |
Likely traction change |
Consequence |
Safest next decision |
|
Polished wet root, crossing at an angle |
Lateral grip drops immediately |
Downhill wheel slip |
Unload the tires, cross as near perpendicular as the bench allows, carry momentum |
|
Slumping soil at the outer bench |
Support under the edge is gone |
Bike and rider slide down the slope |
Move the line toward the uphill bank, or abort |
|
Loose shale over hardpack |
Unpredictable lateral shear |
Front or rear pushes downhill |
Stay neutral, minimise steering and throttle changes |
Body Position Without a Formula
Nobody can hand you a lean angle. It depends on your height, the bike’s geometry, camber steepness, speed, and how much grip is actually there. The MSF teaches it the same way. Its off-pavement curriculum builds fundamental skills on a low-traction surface with an emphasis on body position and control use, coached in person, for the rider in front of them.
Keep the Chassis Neutral and Carry Your Weight on the Pegs
Do not force the bike bolt upright. Do not lay it into the hill either. Aim for a controllable middle. That is where the suspension still cycles and the tires still follow the ground.
Weight the footpegs. That drops your effective centre of mass, settles the chassis, and takes load off the bars so small corrections stay available. Hanging on the grips does the opposite. Keep elbows and knees bent. Terrain deflection then goes into your joints instead of the bike’s line. Pulling steadily on the uphill bar loads the front unevenly. Common reflex, bad one.
Look Through the Exit, and Treat Seated or Standing as a Control Choice
Vision goes along the usable bench to the exit. Stare at the drop-off, or at the one bad patch two feet ahead, and you get exactly the locked-up defensive body you do not want.
Standing can improve range of motion and allow the motorcycle to move beneath the rider on rough ground. Sitting may suit a smooth, slow, well-supported traverse. Choose the position that preserves balance, control access and a stable pressure through the footpegs. If low-speed balance is your limiting factor, drill that separately with slow-speed balance work, because the two skills fail in different ways.
Coordinate Throttle, Brakes, Steering and Speed
One traction budget, four spenders. No pace and no throttle position transfers between bikes, slopes and surfaces.
Set Entry Speed While Both Tires Are on Stable Ground
Finish braking before the camber starts. Then carry enough speed to stay balanced and keep progressing, but not so much that you cannot follow the bench. A bad entry speed forces the two things you least want mid-slope. Hard braking, or a big throttle input. Drilling emergency stops on flat, boring ground is what makes this feel routine.
Know Your Throttle-Off Behaviour, and Avoid the Mid-Slope Stop
Test the power mode and the regen setting on level, low-consequence ground. Before it matters. Some bikes slow hard when the throttle shuts. And do not change settings mid-traverse unless the manual allows adjustment while moving.
Feed power progressively. Only as much as keeps the bike moving smoothly. Keep steering corrections small and pointed along the bench, because sawing uphill and downhill loads both contact patches for no return.
Prefer continuous motion to stopping, since restarting on a side slope needs more grip than never stopping did. If a stop becomes unavoidable, take the most supported ground you can reach. What you never do is push toward a failed bench or a blind exit purely to avoid stopping.
Set Up From the Manufacturer’s Approved Baseline
Start where the manual starts. Inspect, write down what you find, change one approved variable at a time. Copying another rider’s pressure, clicker count, mode, or regen setting is guessing with extra steps. Their bike is not carrying your weight anyway.

Tires and wheels first. Tread condition, cuts, embedded rock, rim damage, wheel security, packed mud. Then pressure, checked cold, against the guidance for your model and load. Cold matters.
Michelin’s position is worth internalising, because even a small deviation from correct pressure noticeably affects handling, stability and grip, and running under-inflated greatly increases the risk of tire creep or unseating the tire, even with rim locks fitted.
Suspension next. Follow the manufacturer’s own procedure for sag, spring support, damping positions, seals and free movement. A worn bike cannot be fixed with guessed clicks. Then pick a documented power mode that responds predictably for you on that terrain. Maximum output is not automatically useful when grip is the scarce resource.
Fit and Recoverable Mass
Recoverable mass decides how bad your worst day gets. Can you reach the controls, hold the bike up at walking pace, and pick it up on a slope? On bad footing, tired, after a stall?
Published weight does not answer that. Mass genuinely affects handling and recovery on technical ground, and riders argue endlessly about where the line sits, but no threshold separates manageable from unmanageable. Too many variables. Your strength, the slope, the footing, whether anyone is riding with you.
A Sur-Ron Light Bee X, a Talaria, and a full-size electric like the Stark Varg sit in genuinely different places on that scale. All legitimate, for someone. Test it instead of reading it off a spec sheet: on level, low-consequence ground, stall the bike deliberately, lay it over, and pick it up. That answer is yours, not the brochure's.
|
Observed problem |
Record these conditions |
Low-risk checks |
Next decision |
|
Rear drifts downhill |
Surface, throttle input, mode |
Tire condition, pressure vs baseline, throttle response |
Reduce demand, or skip the section |
|
Front pushes downhill |
Speed, braking, steering input |
Front tire, wheel, fork movement |
Retest on safer ground |
|
Bike feels harsh and skips |
Bump shape, speed, rider position |
Pressure and suspension baseline |
Make one approved change |
|
Throttle closure unsettles the bike |
Mode, regen setting, slope angle |
Documented control behaviour |
Select a predictable approved setting |
Select the ride mode before entering the side slope, while the bike is on level ground. Use the manufacturer-approved mode with the most predictable throttle response for the rider; do not change modes mid-traverse.
If It Slides, Stalls or Tips, Do Not Add Power
Not every downhill slide is recoverable. Protect yourself first. Stop the bike moving further, and do not turn a lost contact patch into a fall.
- Abrupt throttle, brake, or bar input eats the grip you have left. If the tires drift, keep inputs measured and work out whether you still have control at all.
- Still responsive? Steer toward the open supported exit. Do not haul it sharply uphill to get the original line back.
- Shut the bike down using the model’s procedure before touching it after a stall or tip. That prevents unintended throttle response, and keeps hands, clothing, and tools clear of the drivetrain.
- Your footing before the bike. Never stand directly downhill of a machine that can slide, roll or fall onto you.
- No dragging it past what your group can manage, toward a drop-off, or across a fragile edge. If it cannot come out safely without power, pass accurate coordinates and get proper help.
Then inspect before riding again, following the manufacturer’s instructions. Impacts matter more on an electric than people assume. The pack is the reason. Mechanical abuse such as drops, crushing, impact, and shock is a recognised cause of internal short circuits, and damaged lithium-ion batteries carry greater potential to short, along with increased fire and explosion risk.
UL’s guidance is to inspect for bulging, cracking, hissing, leaking, rising temperature or smoke, and to remove the pack from service immediately, away from anything flammable, if any of those appear. Same goes for a damaged cable, control, wheel, or brake.
Practise on a Low-Consequence Traverse

Build the skill where a mistake costs nothing. Practice tests your control and your decisions. It does not prove a dangerous section is crossable.
- Pick the ground. A short legal side slope. Firm soil, wide supported bench, clear sight distance, no drop-off, stable ground at the exit.
- Set the baseline. Controls, tires, wheels, suspension. Confirm the approved power mode and learn what the bike does when the throttle closes, before you enter the line.
- Change one thing at a time. Vision on one pass. Entry speed on the next. Then peg weighting, then progressive throttle. Hold everything else constant, or you learn nothing.
- Stop when it degrades. Surface breaking up, wheels drifting repeatedly, anything unexpected from the bike. Stop means stop.
- Write it down. Surface, settings, position, speed range, what actually happened. A setup that works on dry shallow camber may not transfer to wetter, looser, or steeper.
Coaching helps here. The MSF’s DirtBike School is a one-day hands-on session open to anyone six and older, covering basic riding skills plus risk management and environmental awareness, with an Introduction to Trail Riding course as the next step. Coached feedback on a low-traction surface is hard to replicate alone.
Model Checks Before an Off-Camber Ride
Treat the EM-5 Pro as a candidate to verify, not as proof of off-camber suitability. For this terrain, check current official information for complete-bike mass, seat height, wheel and tire fitment, suspension setup, control modes, load limit, and water-exposure restrictions. Peak power, rated top speed, and price do not predict lateral traction or whether a rider can recover the motorcycle on a slope.
Use the manufacturer’s user manuals and spec sheets to confirm the factory setup and the permitted adjustment procedure for the exact model. If an adjuster range, tire fitment, or operating limit is not documented, obtain model-specific guidance before changing it.
Before any side-slope use, confirm that the rider can reach the controls, balance the motorcycle at walking speed, and complete a no-power recovery on level ground. Then verify that the intended route authorizes the vehicle class; quiet operation, knobby tires, or a published climbing figure do not establish legal access.
If fit, recovery ability, route eligibility, or a supported exit cannot be confirmed, the off-camber section is not an appropriate test location. Practice on authorized, low-consequence terrain and reassess the route rather than using the slope to discover a setup or handling limit.
Evidence and Limits Behind This Guidance
Land-Manager Rules Before Technique
Every access statement traces to a land-manager source rather than rider consensus. Forest Service travel-management rules and vehicle-class designations, BLM guidance on wet-route damage. Where local rules differ, local rules win.
Rider Reports as Context, Not Proof
Rider discussions can identify recurring concerns such as mass, footing, and manual recovery, but they do not establish a universal setup or safe threshold. Conflicting rider figures should remain labeled as anecdotal and should not replace current manufacturer documentation or supervised training.
No Universal Settings, on Purpose
No universal lean angle, body position, speed, tire pressure, ride mode, or suspension setting is prescribed. Manufacturer documentation governs the specific machine; land-manager sources govern access; formal training sources govern technique. Where evidence does not support a universal number, the limit remains explicit rather than being filled with an estimate.
The Short Version Before You Commit
Off-camber riding rewards two habits above all. Protect the grip you have not spent yet, and keep an exit within reach. Verify access. Read the whole bench.
Decide what a slide would actually cost. Start from approved settings, then coordinate your inputs without asking for anything sudden. When the surface fails, or the exit closes, or recovery would pull you toward exposure, turn around. Most bad off-camber outcomes are not skill failures. They are decisions made after the margin was gone.
Frequently Asked Questions
Can electric dirt bikes go on trails?
Only where that vehicle class is designated. No blanket yes exists. On Forest Service land, routes not shown on the Motor Vehicle Use Map are not open to public motor vehicle travel, and the map lists which classes are allowed.
- Check current maps, posted signs, and seasonal closures.
- Registration and equipment rules vary by state.
- Quiet operation grants nothing on non-motorized trail.
What makes an off-camber trail dangerous?
The tilt. Tires must roll forward while gravity pulls them sideways, so part of your grip is committed before you accelerate, brake, or steer. Changing surfaces, weak outer edges, limited stopping room, steep exposure below the tread. All of them raise the cost of losing it.
Should you lean uphill on an off-camber trail?
No universal rule exists. Position depends on camber angle, speed, tire support, bike geometry, surface, and whether you are seated or standing. Adaptable control is the target. Not a fixed body angle.
Should tire pressure be lowered for more off-camber traction?
Not automatically. Stay inside the approved range for the bike and tire.
- Small pressure deviations noticeably change handling, stability and grip.
- Under-inflation raises the risk of tire creep and unseating, even with rim locks fitted.
- Softer does not mean more lateral grip.
What should you do if an electric motorcycle slides downhill?
Nothing abrupt. If control remains, steer toward an open supported exit rather than forcing the bike back uphill. After a stall or tip, shut it down by the approved procedure. Secure your footing, stay out of its downhill path, and call for help when recovery would pull toward exposure.
Does regenerative braking help on a side slope?
Sometimes. It can also hurt. Strong regen slows the bike when you close the throttle, useful on a controlled descent, unhelpful mid-traverse when it unsettles the rear. Learn what your selected mode does on flat ground first. Do not adjust it mid-slope unless the manual permits that.
Sources
- USDA Forest Service, Motorized Vehicle Use Maps (MVUM) (2026)
- Bureau of Land Management, Steer clear of muddy roads and trails this spring (2025)
- Motorcycle Safety Foundation, DirtBike School (2026)
- Michelin, Check your motorcycle tire pressure (2026)
- Michelin, Motorcycle tyre pressure guide (2025)
- UL Solutions, Safety Guidelines for Large Lithium-Ion Battery Systems (2026)
- UL Solutions, Enhance Workplace Lithium-ion Battery Safety (2026)


Looking for something else?

Electric Dirt Bike Loses Power Under Load: Causes and How to Fix It
LEARN MORE
Electric Dirt Bike Bolt Torque Checklist: What to Check and Where the Numbers Come From
LEARN MORE
How to Bleed Electric Dirt Bike Brakes Safely
LEARN MORE
Electric Dirt Bike Throttle Not Working: What to Check First
LEARN MORELooking for something else?

Electric Bike Battery Not Charging? Work Through This Before You Buy a New One
LEARN MORE
Electric Dirt Bike Error Codes: What They Mean and What to Check First
LEARN MORE
Electric Dirt Bike Brake Rotor Rubbing: Diagnose the Cause Before Adjusting
LEARN MOREYou may also like
Moto eléctrica todoterreno para adultos EM-5 con luz
VALTINSU EM-5 Pro Off-Road Black Electric Dirt Bike
VALTINSU EM-5 Pro Green Electric Dirt Bike
Further reading

Electric Dirt Bike Trailside Power Loss: Recovery Plan When the Battery Is Dead

Electric Dirt Bike Fall Riding on Wet Leaves: Grip, Hidden Obstacles and Braking

How to Lift a Fallen Electric Dirt Bike Without Hurting Yourself or the Bike
