

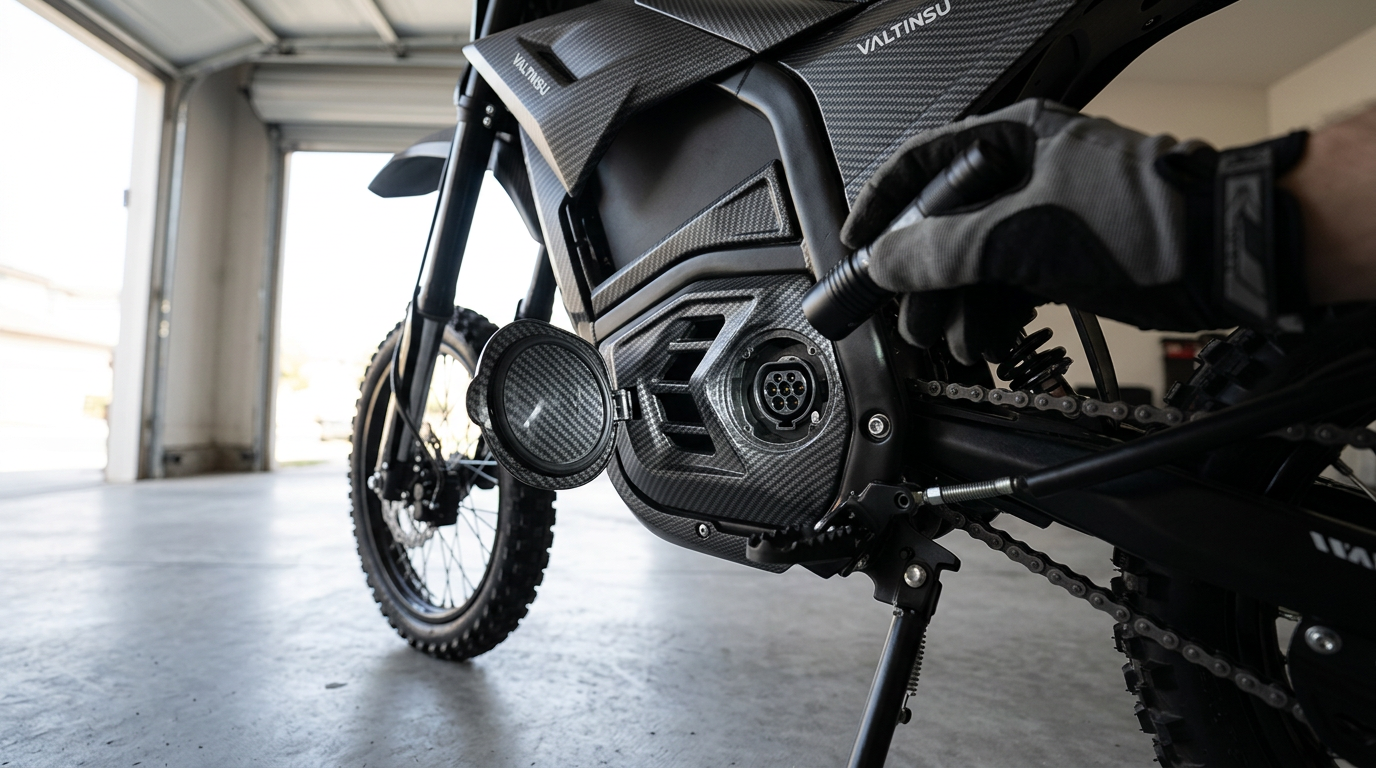
How to Inspect an Electric Dirt Bike Charging Port Safely
Before every charge, switch the bike off and inspect the charging port with a flashlight. The inlet should be dry, clean, undamaged and firmly mounted; if it is wet, corroded, bent, burned or loose, do not connect the charger.
An electric dirt bike charging port is exposed to spray, grit, mud, washing and impact, especially when it sits low on the frame. A quick visual inspection can catch moisture, debris, bent contacts, corrosion and heat damage before they cause an interrupted charge or an unsafe connection.
Use five pass-or-stop checks: dry, clean, straight, tight and matched. The port must be dry and free of debris; its contacts must be straight; the socket must be secure; and the charger must match the bike. If any check fails, leave the charger disconnected and document the condition for support.
This guide starts with a 60-second pre-charge check, then explains how to inspect and clean the port, distinguish a port fault from a charger or battery problem, run a controlled charging test and collect the evidence a technician needs.
The 60-Second Check Before You Plug In

Six things, one flashlight, no tools. If everything below reads clean, plug in. If any row lands in the right-hand column, stop and document it.
|
Check |
What good looks like |
Stop if |
|
Cover and seal |
Cap present, closes flush, seal soft and intact |
Cap missing, seal torn, housing cracked or gapping |
|
Inside the inlet |
Dry throughout, no mud, sand or dust |
Any moisture, damp residue or packed debris |
|
Pins and contacts |
Even spacing, even depth, bright metal |
Bent, recessed, missing, or green and white crust |
|
Heat marks |
No discoloration anywhere |
Brown or black marks, melted plastic, burnt smell |
|
Mounting |
Socket sits firm in the body panel |
Port rocks, rotates or pulls away from the panel |
|
Charger plug |
Clean straight contacts, intact insulation |
Bent contacts, cracked shell, melted plastic |
That table is the article in miniature. The rest explains why each row matters and what to do when one fails.
What the Charging Interface Actually Includes
Riders say "port" and mean one thing. It is really three, and the fault can live in any of them.

The Inlet and Its Cover
Outer housing, internal socket, pins, mounting hardware, a moisture seal, and a protective cap. The housing keeps the connector aligned so the plug lands square. The cap and seal do the unglamorous work of keeping trail water out while the bike is parked. Lose the cap and the port has no first line of defence at all.
The Charger Output Plug and DC Cable
The plug carries current into the inlet through its own set of contacts. Behind it, the strain relief absorbs repeated bending, pulling and coiling. Inspect both cable ends closely because damage often develops where the cable enters the plug or charger body.
Wiring, Battery and BMS
Behind the socket, wires run toward the pack. Fuses, connectors, pack temperature limits and the battery management system can each halt a charge on their own. Which matters for one reason: an electric dirt bike not charging is not proof the visible port is damaged.
The charger, a fuse, battery temperature or the BMS may interrupt charging even when the visible inlet looks normal. Understanding how voltage and amp-hours work helps separate a charging-system symptom from visible port damage. Anything behind the body panel or battery enclosure belongs with qualified support.
When a Port Inspection Is Worth Doing

Before Every Charge, and After Every Wet Ride
The 60-second check belongs in the routine, just like tire pressure. Some rides earn a closer look: rain, deep mud, sand, heavy dust, any wash where a hose went near the frame. If your bike carries an IP rating, read it as an enclosure test under defined conditions—not permission to spray water into an open charging inlet.
Worth knowing what those ratings actually promise. The IP code comes from IEC 60529, which grades how well an enclosure resists dust and water ingress (IEC). IPX6 covers powerful water jets against a sealed enclosure. Neither IPX6 nor IPX4 says anything about an inlet with the cap left open.
After an Impact, and After Storage
A fall, a hard landing, a bike sliding around in a truck bed. Any of those can loosen a socket or push a contact out of line without leaving a mark. Check after all of them, and again after the bike has sat a season, because seals stiffen and condensation finds its way in.
Changed behaviour counts too. Charging stops unexpectedly. The plug feels looser than it did in spring. The connection works at one angle only. Inspect before
Set Up Before You Look
Power Down and Disconnect
Dry area, good light. Bike off. Unplug the charger from the wall, then from the bike. If the pack has to come out or be isolated, the user manuals for every model give the sequence, and it is model-specific rather than universal.
What to Gather
- A flashlight. Bright and small enough to aim into a recess.
- Lint-free cloth, clean and dry.
- Soft nonmetallic brush for dry debris.
- Your phone, for photographs you will probably need later.
- Residue-free electrical contact cleaner, only if your manual approves it for this connector.
What Never Goes Into the Inlet
Do not insert screwdrivers, metal picks, multimeter probes, wet swabs or oversized cleaning tools into the inlet. They can bend or bridge contacts, leave moisture behind or push contamination deeper into the connector. Electrical testing at the inlet should be performed only by a technician following the model-specific service procedure.
Inspecting the Port, Step by Step
Work outside in. Housing first, then the inside, then the pins, then heat, then the mount.

Cover, Seal and Outer Housing
Start with the cap. Does it fit, does it close flush, has the seal gone hard and cracked? Then the housing. Impact marks, distorted plastic, hairline cracks, gaps where the assembly meets the panel. Each one is a route in for water and grit. The housing should sit evenly against the bike, not proud on one side.
Water, Mud, Sand and Debris
Shine the light in. Insert nothing. Droplets, damp residue, packed mud, fine sand, dust, plant matter. A wet ebike charging port has to dry through the whole connector body, not just look dry on the face. That catches people out after a wash, because the housing dries in minutes and the recesses hold water for hours.
Standing water is a different problem from spray. USFA guidance on lithium-ion equipment after flooding comes down to one thing: water-exposed batteries and their electronics need a professional assessment, not a charge attempt (USFA).
Every Pin and Contact
Compare the contacts against each other. Alignment, spacing, shape, depth. A single pin sitting deeper than its neighbours has usually moved inside the housing, which is a mechanical failure rather than dirt. Watch for a bent charging port pin, pitting, missing plating, black marks, and the green or white powder that means corrosion has started.
Do not straighten anything. Not with pliers, not with a pick, and above all not while the pack is connected. A bent pin is a parts job.
Heat Damage
Brown or black discoloration, blistered or melted plastic, soot, a distorted contact or a hot-electronics smell indicates overheating. Possible causes include contamination, weak contact pressure, damaged wiring, an incompatible charger or an internal charger fault. Stop using the equipment if you notice odour, colour change, excess heat, shape change, leaking or unusual noises (USFA).
Minor marks still count. A contact that ran hot once runs hotter next time, because the damage raises resistance and resistance made the heat. Document it. Leave the connector unused.
Whether the Port Is Loose
Bike off. Touch the outer socket gently and watch whether the assembly moves in its mount. Some clearance between plug and socket is normal. The port itself should not rock, rotate, or pull away from the panel. A loose charging port is one possible cause when charging changes as the plug or cable moves.
The Visible Wiring
No panels come off. Look at whatever wiring, insulation, and grommets are already visible around the inlet. Pinched insulation. Exposed conductor. A split grommet. Wires pulled tight against the back of the socket. If seeing more means opening the battery or reaching into a live circuit, the inspection ends there.
Cleaning and Drying Without Making It Worse

Dry Debris First
Remove light surface contamination with a soft nonmetallic brush, working outward from the socket edges so particles move away from the pin channels. Use compressed air only if the manufacturer permits it, at the specified pressure and distance.
Approved Contact Cleaner Only
If, and only if, your manual permits it: non-conductive, residue-free electrical contact cleaner, sparingly, to loosen stubborn film. Never water. Never household detergent, penetrating oil, or an unspecified lubricant. Those leave conductive residue, attract dirt, and attack the seals.
Then Let It Dry Properly
The charger stays out until every trace of cleaner and moisture has evaporated from the whole connector body. No universal drying time exists. Depth, seal design, temperature, airflow, and volume all move the answer. The test is the port, not the clock.
What Cleaning Cannot Repair
This is where good intentions go wrong. Cleaning addresses dirt. It does nothing for hardware.
- A bent, recessed, or missing pin. Parts job.
- Heavy corrosion that has eaten into the plating.
- Melted or cracked housing, and any heat-distorted contact.
- A socket that moves in its mount. That is mechanical, and the fix is behind the panel.
- Broken conductors on the far side of the inlet.
Charger, Cable and Label: The Checks Riders Often Skip
A charging complaint can come from the charger, cable, plug, inlet, battery or BMS. Check the charger side with the same discipline before blaming the port.

The Output Plug
Bent or misaligned contacts, dirt packed into the shell, cracked insulation, melted plastic, uneven wear on one side. The plug should meet the inlet square and seat without force. Pushing hard means something is out of alignment, and forcing it damages whichever part is still healthy.
Cable and Strain Relief
Run the full length of the DC cable through your hand. Cuts in the sleeve, crush marks, sharp kinks, exposed strands. Then spend most of your attention on the two strain reliefs, where the cable enters the charger body and where it enters the plug. Wires pull loose there. Insulation cracks there. Small faults can worsen during a long charging session.
Match the Label, Not the Plug Shape
This compatibility check is easy to skip and essential for safe charging. Compare the printed label on the charger against the voltage, amperage, polarity, and connector your bike actually requires. A plug that fits is not evidence of electrical compatibility, and CPSC has specifically warned riders off universal chargers for micromobility products for exactly that reason (CPSC).
Do not expect the charger nameplate voltage to equal the battery's nominal voltage. The charger output is selected for the pack's charging profile, so compatibility must be confirmed from the model manual and physical labels. The Valtinsu lineup illustrates the difference:
|
Model |
Battery |
Charger on the label |
Charge time |
Water rating |
|
EM-5 |
48V 23.4Ah |
Verify the charger label and manual |
7 to 8 hours |
IPX6 |
|
EM-5 Pro |
60V 27Ah |
67.2V / 5A, CE |
7 to 8 hours |
IPX6 |
|
EM-5 Ultra |
72V 25Ah Samsung |
84V / 5A, CE |
7 to 8 hours |
IPX6 |
|
EM23 |
60V 27Ah |
67.2V / 5A, CE |
6 to 7 hours |
IPX4 |
Do not compare charger output voltage with pack nominal voltage as if they were the same measurement. Use the exact charger specified in the current manual and confirm the physical label before publishing or ordering a replacement.
A matching plug shape does not prove electrical compatibility. Confirm the bike model, battery specification, connector, polarity and charger output against the current manual or physical label. If you keep more than one bike, label each charger and store it beside the correct machine.
Running a Controlled Charge Test
Follow the Specified Connection Order
If the port, plug and cable pass inspection, place the bike and charger on a flat, dry, well-ventilated, non-combustible surface. Follow the model manual's connection sequence exactly.
Many models want the charger in the wall first, then the bike. CPSC guidance is to follow the manufacturer's charging instructions, be present while charging, and use only the charger supplied or recommended for the device (CPSC). Our full home charging routine covers the wider setup.
Watch the Indicators, Then the First Few Minutes
Read the charger LED alongside the bike display, battery indicator or app. Colours, flash codes and display update intervals are not standardised, so interpret them using the model manual and remain present during the initial charge check.
Disconnect immediately if you notice concentrated heat at the connector, flickering indicators, clicking, arcing, smoke or a burning smell. Charge only within the battery temperature limits in the model manual; after a hard or hot-weather ride, wait until the pack is within that specified range.
Symptoms and What They Usually Mean
These five symptom patterns can help narrow the next safe check. They are not a final diagnosis.
|
Symptom |
Usual causes |
What to do |
|
No charger light at all |
Dead outlet, tripped GFCI, damaged AC cord, internal charger fault |
Test the outlet with another device, inspect the AC lead. Do not assume the port |
|
Light stays green immediately |
Full pack, poor port contact, wrong charger, open circuit, BMS protection state |
Confirm what green means in your manual before replacing anything |
|
Charging shown, level will not rise |
Slow display, weak charger output, loose port wiring, pack temperature, BMS or cell fault |
Allow time for the display, then stop and request support |
|
Charging stops when the plug moves |
Worn contacts, loose socket, damaged strain relief, broken conductor in the cable |
Stop. Do not tape or wedge the plug at an angle |
|
Connector gets hot |
Contamination, weak contact pressure, internal damage, incompatible plug |
Disconnect if safe, let it cool, do not retest a discoloured connector |
Where DIY Ends
Some findings are not troubleshooting steps. They are stop signs.
- Water still inside the inlet, or a pin that is bent, missing, recessed or loose.
- The socket moves in the body panel.
- Heavy green or white corrosion. Melted plastic. Dark heat marks.
- Exposed wiring, sparking or smoke. A burning smell counts on its own.
- A pack that is swollen, leaking, cracked, or unusually hot. Stop testing entirely.
- A fuse that blows twice, or charger output that does not match its own label.
Never open the battery pack, bypass the BMS, force a plug into a damaged inlet or repeatedly replace a blown fuse without diagnosing the cause. Damaged lithium-ion equipment and incorrect charging can create a fire risk; a compromised connector should remain unused until it is assessed.
What Support Needs From You
A good support ticket saves a week. Send the model, the serial number, and a clear photo of the charger label. Then a straight-on shot of the inlet, close-ups of individual pins or any discoloration, and a photo of the charger output plug. A short video is worth more than words for socket movement or an intermittent indicator. Route it through after-sales support with the rest below.
- Charger light colour or flash pattern, and any display error code.
- When the problem started, and whether it started suddenly.
- Recent history: rain, mud, a wash, a drop, transport, long storage.
- Which troubleshooting steps you have already run, including anything that changed the behaviour.
That evidence lets a technician separate a port fault from a charger fault, a wiring fault or a BMS state without guessing. Guessing is what ships the wrong part.
Preventing the Next Port Failure

Cap Discipline and Washing
Cap fully closed whenever the bike is not charging. That is most of the job. Keep a pressure washer away from the inlet, the seals, and nearby wiring, whatever the IP rating says. After a wet or muddy ride, clean the area safely and let the port dry through before the charger comes near it.
Support the Cable While Charging
Hang or rest the plug and cable so their weight is not levering sideways on the socket for eight hours. Disconnect by gripping the plug body, never the cable. Keep sharp bends off the strain relief. These small habits reduce unnecessary strain on the connector.
Use the Right Replacement Parts
Manufacturer-approved charger only. Lost the original? Source the replacement from the brand or an authorised dealer with the pack label in hand. Replacement chargers and parts are worth ordering properly rather than matching a plug shape on a marketplace listing. And inspect the connector after any crash or rough transport.
How We Built This Guide
This guide follows a three-part fault-isolation method: separate the visible port from the rest of the charging system, verify model-specific figures, and use authoritative safety guidance.
We Separate the Port From the System
A "port is broken" symptom can also come from the charger, cable, battery temperature or a BMS protection state. Check the external system before blaming the inlet, and stop at the panel rather than reaching into a live circuit.
We Check Every Figure Against the Live Sheet
Treat product specifications as model- and revision-specific. Confirm charger voltage, charge time and ingress rating against the current manual, physical label or approved specification sheet before publication.
We Cite the Authorities on Safety
The safety guidance and IP definitions are linked to CPSC, USFA, NFPA and IEC sources below. Model-specific limits still come from the manufacturer manual.
Before You Plug In Again
Dry, clean, straight, tight, matched. Those five checks catch visible conditions that can make charging unsafe or unreliable.
Wet, loose, bent, burned or unusually hot? The answer is the same, however inconvenient it is. Leave the charger out.
Do not force it, probe it or tape it into position. Photograph the inlet, the plug and the charger label, then send them to the manufacturer, an authorised dealer or a qualified technician. Matching a spare charger to the right pack? Compare the electric dirt bike lineup and check the charger figure against the bike before you order.
For current model dimensions, charging hardware and manual references, review the EM-5 Pro product page before ordering or replacing any charging component.
FAQs
How Should I Clean an Electric Dirt Bike Charging Port?
Power the bike off and disconnect the charger before cleaning. If the port is wet, bent, burned, corroded or loose, stop—the correct next step is inspection, not cleaning.
- Disconnect the charger from the wall and the bike.
- Use a flashlight to inspect the cap, housing and contacts without touching them.
- Remove only loose, dry debris with a soft nonmetallic brush, sweeping outward.
- Use residue-free electrical contact cleaner only when the model manual explicitly approves it. Never use water, penetrating oil or a metal pick.
Can I Charge Through a Bent or Recessed Charging Port Pin?
No. A bent, recessed or misaligned contact can create poor contact, arcing or localized heat. Do not straighten or probe it; leave the charger disconnected and have the connector assessed or replaced.
How Do I Know a Wet Charging Port Is Dry?
There is no universal drying time, and a dry outer face does not prove the recesses are dry. Keep the charger disconnected until the model-specific guidance has been followed.
- Do not use a hair dryer, heat gun or compressed air unless the manufacturer explicitly allows it.
- Do not rely on a fixed number of hours; temperature, airflow, port depth and water exposure all change drying time.
- If water may have entered the connector body or battery enclosure, or if residue remains, request a professional inspection before charging.
Why Does Charging Stop When the Plug Moves?
Movement-sensitive charging points to an intermittent connection. Common causes include worn contacts, a loose socket, damaged strain relief or a conductor broken inside the cable.
Stop charging, photograph the port and plug, and note the position that triggered the fault. Do not tape, wedge or hold the plug at the angle that works; that can turn an intermittent fault into heat damage.
Is a Loose Charging Port Dangerous?
Yes. A loose port can create unstable contact, arcing or localized heating, and movement can worsen hidden wiring damage. Stop charging and keep the connector unused until it has been inspected.
Sources
- U.S. Consumer Product Safety Commission, Micromobility: E-Bikes, E-Scooters and Hoverboards (2026)
- U.S. Consumer Product Safety Commission, CPSC Urges Consumers to Not Buy or Use Universal Chargers with Micromobility Products (2024)
- U.S. Fire Administration, Battery Fire Safety (2024)
- U.S. Fire Administration, Lithium-Ion Battery Safety After Flooding (2024)
- National Fire Protection Association, Lithium-Ion Battery Safety (2026)
- International Electrotechnical Commission, Ingress Protection (IP) Ratings (2026)


Looking for something else?

Electric Dirt Bike Loses Power Under Load: Causes and How to Fix It
LEARN MORE
Electric Dirt Bike Bolt Torque Checklist: What to Check and Where the Numbers Come From
LEARN MORE
How to Bleed Electric Dirt Bike Brakes Safely
LEARN MORE
Electric Dirt Bike Throttle Not Working: What to Check First
LEARN MORELooking for something else?

Electric Bike Battery Not Charging? Work Through This Before You Buy a New One
LEARN MORE
Electric Dirt Bike Error Codes: What They Mean and What to Check First
LEARN MORE
Electric Dirt Bike Brake Rotor Rubbing: Diagnose the Cause Before Adjusting
LEARN MOREYou may also like
Moto eléctrica todoterreno para adultos EM-5 con luz
VALTINSU EM-5 Pro Off-Road Black Electric Dirt Bike
VALTINSU EM-5 Pro Green Electric Dirt Bike
Further reading

Electric Dirt Bike Trailside Power Loss: Recovery Plan When the Battery Is Dead

Electric Dirt Bike Fall Riding on Wet Leaves: Grip, Hidden Obstacles and Braking

How to Lift a Fallen Electric Dirt Bike Without Hurting Yourself or the Bike
