

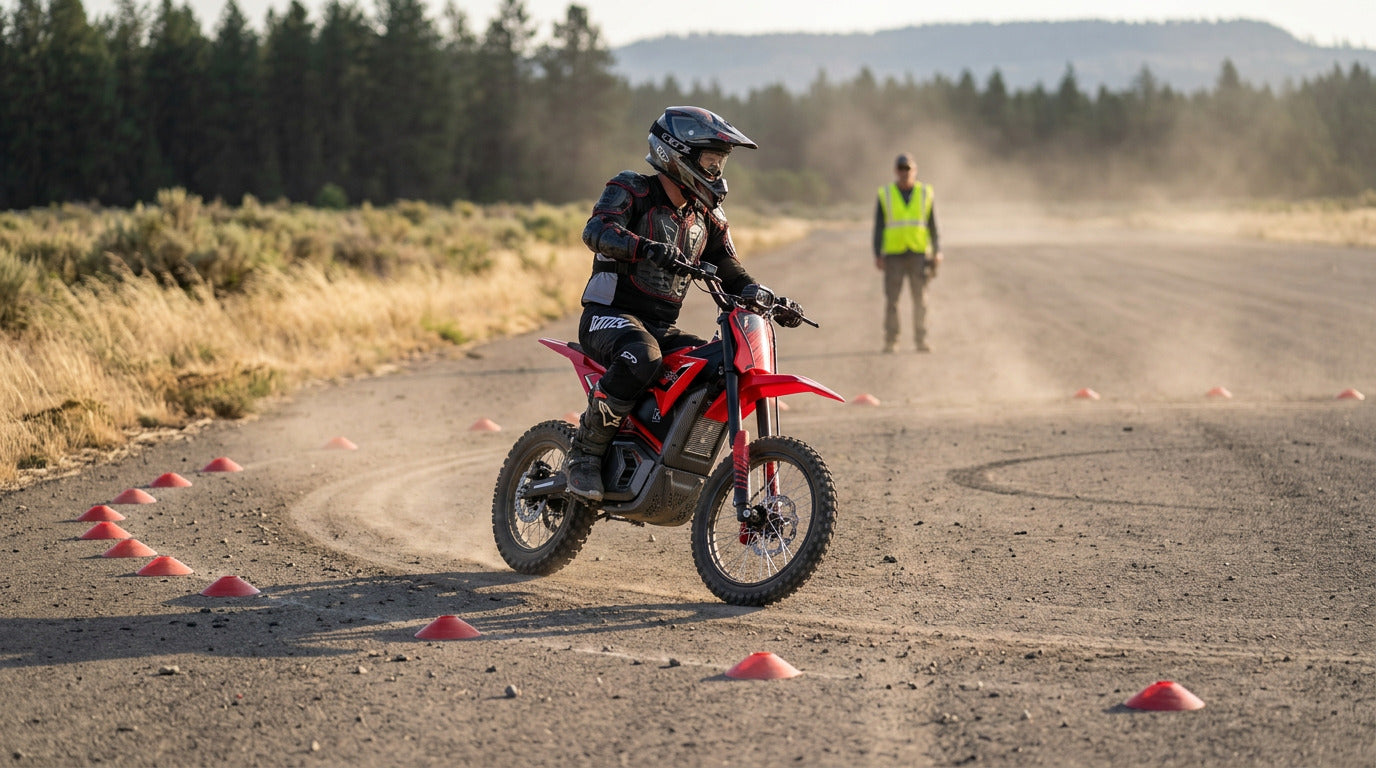
Electric Dirt Bike Slow-Speed Balance Drills for Better Trail Control
To improve slow-speed control on an electric dirt bike, practice a straight walking-pace lane, controlled starts and stops, wide circles, an open cone weave, and a wide figure eight. Keep the motorcycle in one verified configuration, look through the path, use smooth inputs, and stop the set when control, traction, or concentration becomes inconsistent.
Low-speed balance is not sitting motionless, and it is not refusing to put a foot down. On an adult electric off-road motorcycle it is holding a chosen path while vision, steering, motor output, braking and rider movement stay coordinated.
Use this five-drill progression:
- A straight walking-pace lane
- Controlled starts and planned stops
- Wide circles in both directions
- An offset cone weave
- A repeatable figure eight
Use a legal closed practice area with a competent adult observer or qualified coach. Begin only after the rider can identify every control, demonstrate a normal throttle return and brake feel, and explain the stop signal. A coach is required whenever the rider is unfamiliar with the motorcycle, cannot keep the course clear, or cannot recover a small lean without help.
Define Better Balance Through Repeatability
Repeatability is the measurement. Not slowness.
A successful low-speed repetition shows all of this:
- The motorcycle stays inside the marked lane
- Vision points toward the intended path
- Motor output stays smooth and deliberate
- Small steering corrections, not large ones
- No sudden acceleration used to save a falling bike
- No repeated paddling with both feet
- The bike finishes pointed where the rider planned
- The rider can explain what felt different
Riding as slowly as physically possible is a different skill, and often a worse one to practice first. Excessively slow speed tends to produce bigger steering corrections and pulls the rider’s eyes down toward the front wheel. Aim instead for the slowest pace that stays repeatable and controlled for that rider, on that motorcycle, in that space.
Build a Legal Closed Practice Area
Course design is part of the riding skill. A good layout removes variables nobody should be fighting on day one.
Choose Firm, Predictable Ground
Use a legal closed course, private property with permission, or a designated training area. The first session wants level ground with consistent traction. Stay away from:
- Public roads and sidewalks
- Active parking lots
- Crowded trailheads
- Steep slopes
- Deep sand, mud, loose rock and ruts
- Wet grass
- Blind entrances
MSF DirtBike School teaches off-highway skills at controlled sites and recommends hands-on instruction for riders still developing basic control. There is a reason that training happens on a closed range.
Create Entry, Drill, and Runoff Zones
Low-profile cones or flexible markers are enough. Four areas:
- An entry zone where the motorcycle settles
- A clearly marked drill area
- A wide runoff zone
- A separate waiting area for the coach and any other riders
Size the entry, drill and runoff zones from the rider’s demonstrated low-speed stopping distance on that surface, then add a conservative margin. Keep the observer and waiting riders outside the travel, fall and runoff paths. If a clear runoff cannot be maintained beyond every stop, do not begin.
Keep One Motorcycle Moving at a Time
The coach stays outside the travel path and sets signals for start, stop, abort and power-off before the first repetition. Gear up as if it were a trail ride, because low-speed falls still put a knee and a wrist on the ground. Our safety gear checklist covers what a closed-range session assumes you own.
Check Rider Fit and Motorcycle Response First

Poor fit imitates a balance problem almost perfectly. So does an inconsistent control. Rule both out before blaming technique.
Confirm the Rider Can Reach Every Control
The rider should reach the throttle and both brake controls without twisting a wrist into an awkward angle and without releasing a grip. Foot controls, where fitted, need to be findable without hunting for them.
Seat height alone does not decide fit. Rider weight, leg reach, control reach, strength and the mass the motorcycle carries all matter, which is what our electric dirt bike sizing guide works through in detail.
Inspect the Bike Without Changing Its Setup Arbitrarily
Confirm that:
- The throttle returns freely
- Brake controls move and return consistently
- Handlebars travel through their intended range without pulling cables
- The battery is secured
- Tires show no obvious damage
- Controls and fasteners have no visible looseness
- The selected operating mode matches the manual
Model-specific setup lives in the Valtinsu user manuals. This is not the moment to invent a tire pressure, a suspension setting, a brake adjustment or a power mode. Follow the motorcycle and tire manufacturers’ documentation.
Understand Why Electric Low-Speed Control Feels Different
Electricity is not automatically easier or harder at walking pace. It is arranged differently, and the difference sits in one missing control.
Throttle Control vs Clutch Control
A gas off-road motorcycle can slip the clutch to meter drive at very low speed. Many electric dirt bikes give the rider no equivalent layer.
A small throttle movement may request motor torque directly instead. That puts the weight on a relaxed wrist and a repeatable closed-throttle reference, which is why the first drill here is a straight line.
Geared Motor vs Direct Drive
A geared motor uses reduction gearing to increase wheel torque at low motor speed. Actual grip response still depends on controller mapping, selected mode, throttle calibration, total gearing, load and traction. On the exact motorcycle being used, treat every input as potentially stronger than expected until its documented low-speed response is familiar.
The EM-5 runs a geared drivetrain, so its low-speed value comes from usable pull rather than a top number. Its product page lists a 48V system, three speed settings and 40 mph maximum capability. None of those settings turn a balance drill into a speed test. Our watts and torque guide unpacks the mechanism.
Use One Main Coaching Cue per Short Set
Use one main attention cue per short set unless an immediate safety error requires the observer to stop the run.
The rider completes a short repeat set under unchanged conditions while the observer watches one main target. Several simultaneous cues make it difficult to identify what changed, but any unsafe control use, unexpected drive or loss of course control requires an immediate stop rather than delayed feedback.
Run the set like this:
- Choose one observable target.
- Watch the complete repetition.
- Give one brief correction.
- Repeat without changing the course.
- Review the short set together.
Corrections that actually work sound like this: look at the exit cone, close the throttle before the stop, use smaller steering inputs, enter at the same pace, keep one foot ready instead of paddling both.
Repetition count alone does not establish readiness. Advance only after several controlled runs show the same line, predictable inputs, no worsening fatigue and no safety intervention; reset the observation after any stop condition.
Step 1: Hold a Straight Walking-Pace Line
Set Up a Wide Straight Lane
Make the lane wide enough that the rider does not feel trapped. Narrowing the path early encourages front-wheel fixation and the abrupt corrections that follow it.
The rider enters at a controlled low pace, looks past the end markers, and rides through without stopping inside the lane. This off-road motorcycle walking pace drill exists to teach one distinction, and it is a distinction most riders have never been asked to name:
- A small steering correction
- A throttle correction
- A deliberate foot placement
- An uncontrolled grab at a falling motorcycle
Start in the Position That Preserves Control
For a level, open beginner lane, start seated when that gives secure control reach and deliberate foot placement. Use standing practice only after the rider can operate the exact motorcycle smoothly in that position and the instructor’s method calls for it.
The first objective is not advanced body separation. It is repeatable steering, steady motor response and vision directed through the lane.
Progression Gate
A short repeat set should show:
- No lane exit
- No abrupt acceleration
- No repeated two-foot paddling
- Eyes staying up rather than dropping to the wheel
- A similar entry pace each time
If the line will not repeat, widen the course or add a little controlled pace. Demanding still slower movement usually makes it worse.
Step 2: Link Smooth Starts to Planned Stops

Start Without a Sudden Torque Step
From a stable start, look toward the end marker and request drive smoothly. Once the motorcycle is moving stably, place both feet on the footpegs and keep hands and feet ready for the controls shown in the exact model manual. Use a deliberate foot-down whenever balance is lost; do not try to save a falling motorcycle with throttle.
Stop at a Chosen Marker
The rider closes the throttle and applies the brakes according to the documented controls for that model. A planned stop, not an abrupt one.
Throttle-brake balance on an electric bike is a phrase worth pinning down, because it is not permission to hold significant throttle against the brakes. It describes coordination between drive and speed control. Continuous competing inputs are a different thing and not the goal.
Confirm brake-cutoff behavior from the exact model manual or through a manufacturer-approved check performed by a qualified technician or instructor before the drill. Do not improvise a live propulsion test. Any unexpected drive while a brake is applied is a stop-riding fault.
Progression Gate
A short start-stop set should show:
- No unexpected forward surge
- No missed stop marker
- No control confusion
- Handlebars not turned sharply through the final stop
- A balanced finish with one deliberate foot placement
Riders at this stage often ask which machine suits it. The EM-5 product page lists the fit and mode details that matter, though fit stays a coaching question rather than a purchase.
Step 3: Ride Wide Circles in Both Directions
Begin With a Large Circle
Use flexible markers to lay out a circle big enough to hold a predictable pace without approaching full steering lock. Tight-radius work is a later problem.
Ride several repetitions one way, stop, reset the markers if needed, then repeat the other way.
Look Through the Arc
Head and eyes lead toward the next part of the circle instead of fixing on the front tire or the nearest marker.
Avoid one exact body-position formula. Motorcycle geometry, seat height, peg position, surface and instructor method all change how rider and bike move relative to each other.
Left Turns vs Right Turns
Most riders have a weaker side. Keep the course the same size in both directions so that the coach is measuring a real difference rather than a difference in course size.
Progression Gate
Several controlled circles in each direction should show:
- A consistent path
- No cone contact
- No widening exit caused by sudden throttle
- No repeated foot dabs
- No tension building through the set
Do not shrink the circle until both directions meet the same standard. A rider who can only turn one way well has not finished this step.
Step 4: Connect Turns With an Offset Cone Weave
Use Open Spacing First
Set the markers in a gentle offset pattern. The course should reward early vision and smooth direction changes rather than demanding aggressive steering.
The rider looks past the current cone toward the next opening.
Smooth Path vs Tight Path
A smooth path may use more width at first. A tight path is not better when it needs sudden throttle closure, abrupt steering or repeated foot dabs to survive.
- Reactive path: the rider reaches a cone, looks down, then turns late
- Planned path: the rider sees the next opening early and finishes one turn already aligned for the next
Progression Gate
Several consistent passes should show:
- No cone contact
- Similar entry and exit paths
- No hurried acceleration between cones
- Eyes moving one opening ahead
- No correction growing larger with each turn
Only then does the coach make one modest course change. Never change spacing and pace in the same set, or nobody learns which one mattered.
Step 5: Build a Repeatable Figure Eight

Start With Two Large Connected Circles
Place the two center markers far enough apart that each loop can be completed without rushing the crossover. This is a test of linked skills, not a minimum-radius competition and not a stunt.
The pattern combines:
- Left and right turns
- Vision changes
- Throttle transitions
- Directional planning
- Controlled crossover timing
Focus on the Crossover
The crossover is where it usually falls apart. Riders look down, change speed abruptly, or carry the previous turn a beat too far.
Finish the first circle already looking toward the entry of the second. Done that way, the electric dirt bike figure eight drill becomes a vision and planning exercise rather than a steering-lock challenge.
Figure Eight vs Repeated Circles
- Repeated circles: isolate one direction and expose a weak side
- Figure eights: force continuous direction change and constant reorganization of the motorcycle
- Tight figure eights: add real difficulty, and should wait until the wide pattern repeats cleanly
Progression Gate
A short set of full figure eights should show:
- No marker contact
- No uncontrolled or repeated foot dabs; a deliberate foot-down remains an acceptable abort
- No abrupt drive input
- A controlled crossover
- Similar left and right loop sizes
- No visible decline by repetition five
Reduce the pattern only after several consistent runs remain controlled and the rider shows no fatigue, control confusion or need for intervention.
Measure Control Without Inventing a Minimum Speed
A session record does more for progress than a stopwatch, because everything in the list below can be seen from outside the course.
|
Measurement |
What to Record |
|
Clean repetitions |
Number completed without leaving the course |
|
Foot placements |
Where a foot touched down, and why |
|
Cone contacts |
Which turn or crossover caused the contact |
|
Path consistency |
Whether each run followed a similar line |
|
Throttle errors |
Sudden surge, unintended reopening, or hesitation |
|
Vision errors |
Looking down, or losing sight of the exit |
|
One correction |
The single coaching cue used for that set |
Do not rank riders by minimum mph, cone spacing or turn radius. Those numbers describe a course, not a skill.
Video helps when it is recorded from outside the course. It catches downward vision, late steering, crossed controls, stiff arms and a repeated weak-side error that the rider will swear did not happen. Progress means the pattern becomes predictable.
Rear Brake vs Throttle vs Regenerative Drag
Throttle vs Rear-Brake Control
Throttle creates drive. The rear brake reduces wheel speed through the motorcycle’s mechanical brake system. Different jobs, different systems.
Some instructors use light rear-brake input during low-speed exercises. That method should be introduced only by a qualified coach who knows the machine’s control layout and its brake-cutoff behavior. Copying a gas-bike clutch-and-rear-brake routine onto an electric dirt bike without that check is how riders get surprised.
Mechanical Brake vs Regenerative Drag
Regenerative deceleration, where fitted, may change how the bike slows the moment the throttle closes. Its behavior varies with controller programming, selected settings, speed, battery condition and motorcycle design. Mechanical brakes remain separate physical systems and do not inherit any of that variability.
Consistent Setting vs Changing Setting
Use one documented configuration for the complete repeat set. If mode or regenerative behavior is changed, begin a new set only after the rider confirms the new documented state; otherwise the comparison is meaningless.
Seated vs Standing Slow-Speed Practice

Seated Practice
Seated drills cut the number of variables during early starts, stops and wide turns. They also make deliberate foot placement easier for a newer rider.
Standing Practice
Standing prepares the rider for uneven singletrack, trail obstacles, washboard and the sections where the motorcycle has to move underneath the body. It also adds demands on foot placement, peg pressure, control reach and lower-body endurance.
Which Comes First?
The coach decides, based on rider experience, motorcycle fit, surface and the trail skill being built. Do not convert "stand more often off road" into "every drill must be standing." A rider who cannot work the controls smoothly while standing belongs at a simpler stage. Body position deserves its own study, and Cornering 101 and the rest of the User Guide hub goes further into it than a drill article can.
Choose a Motorcycle by Verified Practice Requirements
No motorcycle is universally easiest at walking pace. What changes between machines is which demand the rider has to manage, and the Valtinsu models sit at two different points on that scale.
|
Model |
Practice-Relevant Character |
What the Rider Must Manage |
|
Geared drivetrain, three speed settings, compact EM-series format |
Low-RPM torque, deliberate throttle closure, mode selection, and rider fit |
|
|
Stronger adult-focused output, 177 lb-ft, and the Volt Green signature option |
More torque reserve, so a relaxed wrist and coach-led progression matter more |
|
|
Control reach and fit |
Rider reaches every control without changing grip or wrist position |
Stable starts, planned stops and deliberate foot placement are possible without strain |
|
Verified control state |
Mode, brake-cutoff and regenerative behavior are documented before practice |
One verified configuration remains unchanged for the complete repeat set |
|
Recoverable mass |
Rider and observer can stabilize and recover the motorcycle without entering a fall path |
Course width, pace and supervision are reduced when mass or response exceeds the rider’s control |
Specifications do not prove low-speed suitability. Use the exact model manual and a fit check to confirm control reach, brake layout and operating state, then keep that configuration unchanged for the complete repeat set.
Product selection cannot replace instruction. Fit, response, weight, control layout and available practice space all matter more than the biggest number on a spec sheet.
Correct Common Low-Speed Errors One at a Time
Symptoms overlap. Use the matrix to choose one primary correction, then observe another short set. Stop immediately for any safety-critical error.
|
Symptom |
Likely Practice Issue |
One Useful Correction |
|
Bike weaves across the lane |
Eyes too close to the front wheel |
Look through the exit |
|
Sudden forward surge |
Abrupt or unintended throttle movement |
Rehearse the closed-throttle position |
|
Rider repeatedly paddles |
Drill is too tight, or pace is inconsistent |
Widen the course |
|
Bike falls inward in a turn |
Speed, steering, vision or rider movement mismatched |
Enlarge the circle and isolate one variable |
|
Turn runs wide |
Rider looks late, or accelerates before the exit is set |
Look toward the next marker earlier |
|
Crossover becomes chaotic |
First loop finished without planning the second |
Mark a clear crossover path |
|
Run five worse than run one |
Fatigue or information overload |
Stop the set and rest |
Resist diagnosing every wobble as poor body position. Motorcycle fit, tire condition, steering resistance, control setup, a surface change and plain fatigue all produce similar symptoms.
Stop Practice When the Bike or Rider Changes
End the session when any of this appears:
- The throttle does not return normally
- Motor output becomes inconsistent
- A brake control changes feel
- Handlebars, cables or controls appear restricted
- A tire loses pressure or shows damage
- An unfamiliar noise develops
- The rider repeatedly mixes up controls
- Vision starts dropping to the front wheel
- Foot placements grow more frequent
- Fatigue makes the rider rigid or frustrated
- The rider starts chasing a smaller circle instead of clean repetitions
- Another person, vehicle, pet or hazard enters the course
Do not finish with one last tight run. The next useful repetition happens after the cause is identified, and anything mechanical belongs in How to Maintain an Electric Dirt Bike or a technician’s hands first.
Move From the Practice Range to Trail Control
Each drill maps onto something real. The straight lane supports narrow trail entrances. Starts and stops prepare the rider for gates, blocked lines and uphill resets. Circles build turn planning. The offset weave develops early vision. Figure eights teach repeated left-right reorganization.
A closed course cannot reproduce camber, roots, ruts, loose rock, steep grades, wet surfaces, blind corners or other trail users. It was never supposed to.
Add one trail variable at a time once the five-step progression is stable. Do not narrow the line, add a slope, change the surface and raise the power mode in one session. Surface changes are also a tire conversation, which our electric dirt bike tire guide handles, and the electric dirt bike collection plus our other riding guides cover the rest of the setup decisions.
Conclusion
Electric dirt bike slow-speed balance drills work when every stage has a clear objective and a clear reason to stop. A straight lane teaches direction. Planned starts and stops organize the controls. Circles expose side-to-side differences. An offset weave teaches path planning. The figure eight links all of it without needing trail speed.
Several controlled, repeatable runs reveal more than one unusually clean attempt. Use one main coaching cue at a time, but interrupt immediately for unsafe control use.
Progress only after repeatable control is demonstrated without fatigue or intervention. Before choosing a motorcycle, compare approved rider age, fit, control reach and recoverable mass; the EM-5 is rated 13+, so adult supervision and local rules still matter for younger riders.
FAQs
Why does an electric dirt bike feel harder to balance at walking pace?
Low speed removes much of the stabilizing effect riders feel at higher speed, so small control errors become more obvious. The usual contributors are:
- Looking at the front wheel instead of through the intended path
- Abrupt throttle changes or late, uneven braking
- Locked elbows, a rigid upper body, or fatigue
- Poor control reach, uncertain foot placement, or a motorcycle that does not fit the rider
Which slow-speed drills should a beginner practice first?
Start with simple, repeatable drills on a flat, legal closed area. Use this progression only after the rider can identify and close the throttle reliably:
- Ride a wide straight lane at walking pace.
- Add planned starts and stops.
- Practice large circles in both directions.
- Ride an open cone weave without tightening it early.
- Finish with wide figure eights.
Should you drag the rear brake during slow-speed practice?
Sometimes, but only if the motorcycle’s manual, brake layout, and motor-cutoff behavior support the technique. A qualified off-road instructor should introduce it; copying a gas-bike drill can be unsafe if a brake switch changes motor response.
Why do I keep putting a foot down in slow turns?
A foot dab usually means the line, vision, speed, or control input became unstable before the turn was complete. Widen the circle, look farther ahead, reduce the number of simultaneous corrections, and repeat at the last size you could control consistently.
How do you know when an electric dirt bike is too large or heavy for a beginner?
The bike is a poor fit when the rider cannot operate the controls or recover a small lean without strain. Check whether the rider can:
- Reach and use every control without shifting out of a stable position
- Start and stop repeatedly without panic or outside intervention
- Support the motorcycle at a planned stop on the practice surface
- Recover a small, coached lean without the motorcycle pulling them over
Sources
- Motorcycle Safety Foundation, DirtBike School
- Motorcycle Safety Foundation, Tips & Practice Guide for the Off-Highway Motorcyclist
- National Highway Traffic Safety Administration, Choose the Right Motorcycle Helmet
- National Highway Traffic Safety Administration, Motorcycle Safety
- UL Solutions, Evaluating and Testing to UL 2849 (electrical-system context only; the standard does not evaluate rider control)
- USA Cycling, Slow Speed Skills (bicycle-focused; does not override motorcycle-specific instruction)
- U.S. Consumer Product Safety Commission, OHV and ATV Safety Information Center
- Bureau of Land Management, Off-Highway Vehicles


Looking for something else?

Fit-First Electric Dirt Bike for Women: Lightweight Models & Seat Height Guide
LEARN MORE
Electric Dirt Bike Weight Limit: What Riders Over 200 lbs Need to Know
LEARN MORE
Electric Dirt Bike for Farm Use: Practical Fencing, Livestock & Land Management Guide
LEARN MORE
Night Riding on an Electric Dirt Bike: Lights, Safety & Setup Guide
LEARN MORELooking for something else?

Mid-Drive vs Hub Motor Electric Dirt Bike: Which Is Better for Off-Road Riding?
LEARN MORE
Electric Dirt Bike vs ATV: Which Is Better for Off-Road Beginners?
LEARN MORE
Electric Dirt Bike Battery: Voltage, Amp-Hour Range & Replacement Tips for Off-Road Riders
LEARN MOREYou may also like
VALTINSU EM-5 Off-Road Electric Dirt Bike
VALTINSU EM-5 Pro Off-Road Black Electric Dirt Bike
VALTINSU EM-5 Pro Green Electric Dirt Bike
Further reading

Electric Dirt Bike Steep Descent Technique: Braking and Body Control

Electric Dirt Bike Whoops Setup: Suspension, Stance and Timing

Electric Dirt Bike on Clay Soil: Setup, Technique and Cleanup
