7 Signs Your Electric Dirt Bike Brake Pads Need Replacement
Electric dirt bike brake-pad replacement is condition-based, but symptoms alone are not enough. Combine a visual check of both pads with the component maker's wear limit, rotor and caliper condition, lever feel and any evidence of contamination.
That is the useful frame for an adult electric off-road motorcycle. You are managing real mass at real speed on loose ground, and the brakes are the component with the least margin for guesswork. Below are seven signs worth acting on, along with the non-pad faults that can imitate each one.
1. Reduced Braking Power

If the bike takes longer to slow than it used to, or you are squeezing noticeably harder for the same result, treat it as a brake inspection trigger rather than something to ride around.
Thinning friction material is the most common cause, but it is not the only one. Possible causes include:
- Friction material worn thin
- Glazed pad surface from overheating
- Contaminated pads
- Air or fluid issues in the hydraulic system
- A caliper piston that is not moving freely
Reduced braking is a system-level warning, not proof of pad wear. Confirm the model on the EM-5 Pro product page and use Valtinsu parts and accessories to review listed brake assemblies; then verify the exact component with the manual or support before ordering.
2. Increased Brake Lever Travel
If the lever travels farther toward the grip before the brake engages, treat it as an inspection trigger rather than proof that the pads are worn.
Hydraulic calipers normally compensate as pad material wears, so lever travel alone is not a reliable pad-thickness gauge. A changed bite point can instead indicate a hydraulic, piston or setup problem.
Air in the line, fluid loss, seal faults, piston problems or system-specific adjustment can all increase travel. Because several faults create the same symptom, inspect the complete brake system before ordering pads.
A useful distinction:
- Firm lever with reduced braking. Inspect pad thickness, pad surface and rotor condition.
- Soft or sinking lever. Treat this as a possible hydraulic fault, stop riding and follow the manual or technician guidance.
Either way, inspect the pads visually before deciding. Lever feel is a symptom, not a diagnosis.
3. Squealing, Screeching, or Grinding

Grinding means stop riding now. Squealing means inspect soon. They are not the same warning and should not be treated the same way.
Occasional squeal
A brief squeak after water, dust or mud may come from debris between the pad and rotor. If braking remains normal and the noise clears once the surfaces are clean and dry, monitor it. If it persists or braking weakens, inspect.
Persistent squeal in dry conditions
Constant squealing during dry-weather braking is a different signal. It commonly points to glazing, contamination, misalignment or advanced wear, and it deserves a visual inspection, especially if braking force has dropped at the same time.
Harsh metallic grinding
A loud metal-on-metal grind can mean the friction material is depleted or debris or hardware is contacting the rotor. Stop riding and inspect the pads and rotor before another use. Continued contact can score the rotor.
|
Stop riding Metal-on-metal grinding is a stop-and-inspect condition, not a ride-home-carefully condition. Braking performance is already severely reduced and rotor damage is accumulating with every application. |
4. Brake Pad Friction Material Is Too Thin

Measure the friction material, not the metal backing plate, and compare it against the specification for your machine rather than a number from the internet.
This is the single most misreported figure in brake content, so it is worth being precise. There is no universal replacement thickness across all electric dirt bikes. Different component manufacturers publish different limits and even use different measuring methods. Valtinsu does not publish a brake pad thickness limit in the materials available, so the correct reference is the Valtinsu user manual for your specific model, or Valtinsu after-sales support.
For context only, here is how much published limits vary between component manufacturers. These apply to those manufacturers’ own bicycle components and are not Valtinsu specifications:
|
Manufacturer |
Method used |
What they state |
|
Shimano |
Measured thickness |
Replace the pad when friction material reaches 0.5 mm or less, for its own hydraulic disc brake components |
|
SRAM |
Go/no-go gauge |
Pads and rotors are checked against slots in the supplied pad spacer rather than a quoted number; if the part fits the slot it is fully worn |
|
Valtinsu |
Not stated |
No brake pad thickness limit is published in the available Valtinsu materials. Check your model manual or contact support |
How to inspect the friction material
You do not need to dismantle anything to get a useful look:
- Park the bike securely and let the brakes cool completely.
- Shine a light into the caliper opening and find the pad. You are looking at the friction compound bonded to a metal backing plate, not the plate itself.
- Check both pads in the caliper. They can wear at different rates.
- Remove the wheel for a clear view if the caliper opening does not give you one, following the procedure in your manual.
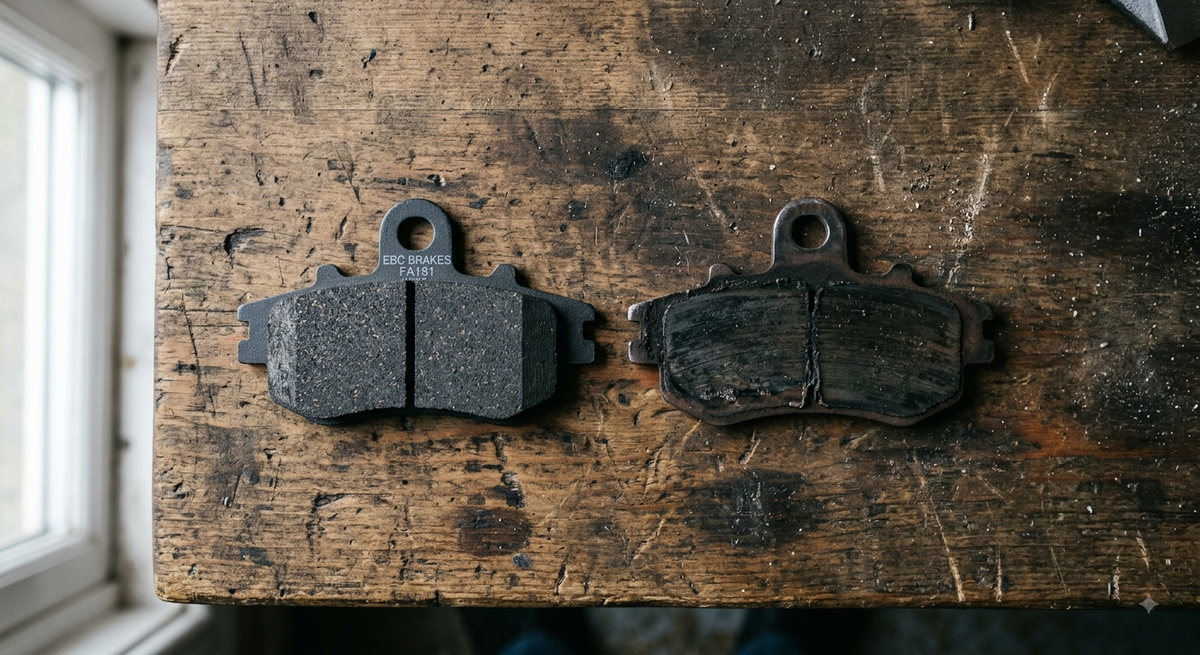
Two practical rules hold regardless of brand. If your pads have a manufacturer wear indicator, follow that indicator rather than eyeballing a measurement. And if the friction material is nearly gone, or the backing plate is close to contacting the rotor, stop riding and replace or have the brakes inspected. Shimano makes the consequence explicit in its own documentation: below its stated limit, the metal spring holding the pads will contact and damage the rotor, which is why the Shimano dealer’s manual instructs replacement before that point.
5. Glazed, Cracked, Contaminated, or Damaged Pads

Pads can fail while still looking thick enough. Surface condition matters as much as remaining material.
Glazing
Overheating can leave the pad surface smooth or shiny and reduce friction. Treat visible glazing with weak or inconsistent braking as an inspection trigger, and follow the component maker's service guidance instead of assuming re-bedding will recover the pad.
Contamination
Chain lubricant, degreaser, penetrating oil and leaked brake fluid all soak into the friction compound. Once that has happened, more heat will not drive it back out. SRAM brake service guidance is direct on this point: contaminated pads have to be replaced, not cleaned and persevered with. Shimano similarly instructs riders to consult a dealer if oil or grease reaches the pads.
Brake pad contamination signs worth recognising:
- A greasy or unusually shiny pad face
- Persistent squeal that survives cleaning the rotor
- Braking that never recovers its previous bite, no matter how many controlled stops you do
- A visible oil residue or discoloured patch on the rotor
Cracks, crumbling and heat damage
Cracked friction material, crumbling edges, compound separating from the backing plate, or heat discolouration all mean the pad is finished. Replace it rather than assessing how much thickness technically remains.
A rotor can usually be cleaned with isopropyl alcohol and a clean cloth. A soaked pad usually cannot.
6. Uneven Pad Wear, Vibration, or Pulsing

Uneven wear and braking vibration are symptoms of a system fault, and the pads are often the casualty rather than the cause.
If one pad in a caliper is significantly thinner than its partner, or you feel pulsing through the lever or bars under steady pressure, replacing the pads alone will usually just produce the same wear pattern again. Possible causes include:
- A caliper piston that is sticking or not retracting evenly
- Caliper misalignment relative to the rotor
- A rotor that is out of true, scored or heat-damaged
- Debris trapped between pad and rotor
- Uneven pad material deposits on the rotor face from previous braking
- Loose caliper or rotor mounting hardware
Both uneven deposits and rotor runout can create pulsing. Inspect the rotor surface and alignment before deciding the rotor is bent.
Replace the pads within that caliper as a complete set, and inspect the piston movement, caliper alignment and rotor at the same time. New pads will not correct the wear pattern if the underlying cause remains.
7. Brake Performance Changes After Hard, Muddy, or Wet Riding

Riding conditions change both how fast pads wear and how the brakes feel immediately afterwards, and the two are worth separating.
Temporary changes
Water, silt or mud can briefly reduce bite. If braking remains otherwise normal and the usual feel returns after the surfaces are clean and dry, continue monitoring. Persistent noise or reduced braking requires inspection.
Accelerated wear
Abrasive grit is the real cost. Sand, dust and mud act like a grinding paste between pad and rotor, and long descents or repeated hard braking add sustained heat on top of that. Conditions that shorten pad life include:
- Muddy and silty trails
- Sandy or dusty desert ground
- Rocky terrain with frequent speed changes
- Long sustained descents
- Wet riding, especially followed by pressure washing
Inspection frequency should follow exposure, not a model's published climb rating. After repeated descending, mud, sand, water or any lasting change in braking, inspect both pad condition and the rotor-caliper system before the next ride.
If braking feel has changed and has not returned to normal after a ride or two, inspect rather than wait.
When Should You Replace Brake Pads?
Use this to separate a confirmed replacement condition from a symptom that needs diagnosis first.
|
Symptom |
What it may indicate |
Action |
|
Reduced braking power |
Worn, glazed or contaminated pads, or a hydraulic fault |
Inspect pads and rotor. Diagnose before replacing |
|
Metal-on-metal grinding |
Friction material gone, backing plate on rotor |
Stop riding. Replace pads and inspect the rotor |
|
Friction material nearly gone |
Confirmed replacement condition |
Replace as a pair on that wheel |
|
Wear indicator reached |
Confirmed replacement condition |
Replace per the manufacturer indicator |
|
Oil, lube or fluid on the pads |
Contamination. Cleaning rarely recovers a soaked pad |
Replace pads. Clean the rotor. Find the source |
|
Cracked or crumbling pad material |
Confirmed replacement condition |
Replace regardless of remaining thickness |
|
Glazed, shiny pad surface |
Overheating. May persist after bedding |
Inspect. Replace if bite does not return |
|
One pad much thinner than the other |
Caliper, alignment or debris problem |
Replace as a pair and have the caliper inspected |
|
Persistent vibration or pulsing |
Uneven deposits or a rotor issue |
Inspect the rotor face before replacing anything |
|
Lever sinking under steady pressure |
Hydraulic fault, not necessarily pad wear |
Stop riding. Have the system inspected |
How Often Should You Inspect Electric Dirt Bike Brake Pads?

Inspect before every ride at a glance, and properly after any hard, wet or abrasive session. Fixed hour or mileage intervals are not reliable, because pad life varies too much between riders and terrain to reduce to a single number.
What actually drives wear rate:
- Riding intensity and how often you brake hard
- Terrain, particularly sand, mud and grit
- Water exposure and post-ride washing
- Amount of sustained descending
- Rider weight and any load carried
- Braking style, including habitual dragging
- Pad compound fitted
- Manufacturer guidance for your model
A practical habit rather than a schedule:
|
Riding situation |
Why it matters |
Practical inspection habit |
|
Before any ride |
Cheapest possible check |
Glance at pad thickness, rotor and lever feel as part of your pre-ride routine |
|
After muddy or sandy riding |
Abrasive grit can accelerate wear |
Full visual inspection once the bike is clean and dry |
|
After long or repeated descents |
Sustained heat can glaze the pad surface |
Check pad surface condition and bite quality on the next ride |
|
After a wash or water crossing |
Water and detergent can reach the friction surface |
Check for residue on the rotor and test brakes at low speed before riding |
|
After any change in feel |
Feel change is the earliest signal you get |
Inspect before the next ride rather than waiting |
|
When fitting new pads or a rotor |
New surfaces have not mated yet |
Bed the new components in following the manufacturer procedure for your bike |
Shimano frames the same idea as a pre-ride routine in its own documentation, listing pad thickness, fluid leakage and rotor condition among the items to check before riding. The principle transfers even though the numbers are component-specific.
Quick Brake Pad Inspection Checklist
Run through this with the bike cool and securely parked:
- Friction material clearly present on both pads, checked against your model manual
- Manufacturer wear indicator, if fitted, still visible
- Both pads in a caliper wearing at a similar rate
- Pad surface matte and even, not shiny, cracked or crumbling
- No oil, grease or fluid residue on pads or rotor
- Rotor face smooth, with no deep scoring, bluing or cracking
- Lever bite point consistent, firm, and in the same place each pull
- No dragging when the wheel spins freely
- No fluid weeping at lever, hose or caliper
- Front and rear both checked, since they are separate systems
When Not to Ride
Some findings mean the bike goes on the stand, not back on the trail. Do not ride if you have:
- Metal-on-metal grinding from the caliper
- A lever that reaches the handlebar or grip with poor braking
- A lever that keeps sinking under steady pressure
- Any visible fluid leaking from the lever, hose or caliper
- Cracked, crumbling or severely damaged pad material
- A cracked, deformed or deeply scored rotor
- A brake that stays applied after you release the lever
- A major, unexplained loss of braking power
|
Get it inspected before the next ride None of the conditions above improve with riding, and several get more expensive with every application. Have the brakes inspected by Valtinsu after-sales support or a qualified motorcycle technician before using the bike again. Brake work involving the hydraulic system is not a learn-as-you-go job. |
Valtinsu Brake Resources and Replacement Parts
Use the Valtinsu electric dirt bike collection and the EM-5 Pro product page to identify the current model pages. Neither page publishes a universal pad-wear limit or authorizes a one-size-fits-all replacement part, so confirm the fitted brake system with the model documentation.
Model-specific inspection guidance belongs in the Valtinsu user manuals. The Valtinsu parts and accessories catalogue lists brake levers, assemblies and a rotor; it does not guarantee that one pad or assembly fits every model. Contact support to confirm the correct component before ordering.
Valtinsu also advises powering the bike off before installation, never forcing a component that does not align, and using a qualified technician for brake, throttle, wiring or drivetrain work if you are not confident. That guidance is worth following on brakes specifically.
Bottom Line: Replace on Condition and Diagnose the System
Brake pads are consumables, but replacement depends on condition and the manufacturer's limit. Stop riding for grinding, a sinking lever, a fluid leak, major loss of braking or damaged friction material. Diagnose squeal, lever travel, pulsing and uneven wear before assuming pads alone will fix the problem.
Compare both pads in each caliper with the manufacturer's specification, replace the caliper's pad set together, and inspect the rotor and caliper at the same time. Bed replacement components according to the exact component procedure.
FAQs
Does brake squeal alone mean the pads need replacement?
No. Squeal is a symptom, not a wear measurement. Use the conditions around the noise to decide what to do next:
- Brief noise after water or mud that clears while braking stays normal: clean and dry the surfaces, then monitor.
- Persistent dry squeal with reduced braking: inspect pad condition, rotor condition, alignment and contamination.
- Metallic grinding: stop riding and inspect immediately.
How do I compare brake pads with the manufacturer's minimum thickness?
Use the measurement method in the brake-component or model documentation, because limits and measurement points vary.
- Let the brake cool and secure the bike.
- Identify the friction material and any manufacturer wear indicator; do not include the metal backing plate.
- Measure at the location and with the method the manufacturer specifies.
- Compare both pads in the caliper with the exact limit.
- If either pad is at or below the limit, replace the pad set and inspect the rotor. If no limit is available, contact support.
Should both pads be replaced if one wears faster?
Yes. Replace the pads within the same caliper as a set so the friction surfaces remain matched. Uneven wear also requires diagnosis: inspect piston movement, caliper alignment, the rotor, trapped debris and mounting hardware before fitting the new set.
Can contaminated brake pads be cleaned instead of replaced?
It depends on what reached the friction material:
- Oil, chain lubricant or brake fluid soaked into the pad: follow the component maker's guidance; replacement is normally required.
- Water or loose surface dirt only: clean and dry the system using an approved method, then reassess at low speed.
In either case, correct the source and inspect the rotor before installing or testing pads.
Does extra brake-lever travel prove the pads are worn?
No. Self-adjusting hydraulic calipers normally compensate for pad wear, so changed lever travel can also indicate air, fluid loss, a seal fault, piston trouble or another setup issue. If the lever is spongy, keeps sinking or is accompanied by fluid leakage, stop riding and have the system inspected.
What else should I inspect when replacing brake pads?
Pads are one part of the braking system. Check the following before returning to the trail:
- Rotor wear limit, scoring, cracks, deformation and contamination.
- Caliper alignment, piston movement and trapped debris.
- Mounting hardware against the manufacturer's procedure and torque values.
- Lever, hose and caliper for fluid leakage.
- The other brake system, because front and rear must be assessed separately.
If any specification or procedure is unclear, use the model manual or a qualified technician rather than guessing.
Sources
- Valtinsu, Electric Dirt Bike Collection. Date not stated. Retrieved 11 Aug 2026. Supports: the lineup uses hydraulic disc brakes; off-road use only, not street legal; replacement brakes, batteries, throttles and controllers are available.
- Valtinsu, Parts and Accessories. Date not stated. Retrieved 11 Aug 2026. Supports: EM5 Brake Levers, EM5 Pro Front and Rear Brake Assemblies and EM5 Pro Front Brake Rotor; installation guidance and qualified-technician advice.
- Valtinsu, User Manuals. Date not stated. Retrieved 11 Aug 2026. Supports: model-specific manuals for EM-5, EM-5 Pro, EM-5 Ultra and EM23, and their authority for model-specific inspection and maintenance.
- Valtinsu, EM-5 Pro product page. Official model reference used to identify the model page; it does not publish a universal brake-pad wear limit or substitute for component instructions.
- Shimano Inc., Hydraulic Disc Brake User Manual (UM-8VR0A-009). February 2022, per document. Retrieved 11 Aug 2026. Supports: the pre-ride inspection routine covering pad thickness, brake oil leakage, rotor cracking or deformation, and correct brake operation.
- Shimano Inc., Tune Up Guide: MTB Disc Brakes. Date not stated. Retrieved 11 Aug 2026. Supports: disc brake pads do not carry a visible wear line, and below the stated limit the metal spring contacts and damages the rotor.
- SRAM LLC, Brake Maintenance Guide. Date not stated. Retrieved 11 Aug 2026. Supports: contaminated pads must be replaced; pads and rotors are measured with go/no-go slots in the pad spacer; bed-in must be repeated with new pads or rotors.


Looking for something else?
Electric Dirt Bike Replacement Parts Availability: What Buyers Should Verify Before Ordering
LEARN MORE
How to Check an Electric Dirt Bike for Safety Recalls by Model and Serial Number
LEARN MORE
How to Choose an Electric Dirt Bike Repair Shop: Questions to Ask Before Service
LEARN MORE
How to Lift a Fallen Electric Dirt Bike Without Hurting Yourself or the Bike
LEARN MORELooking for something else?
Electric Dirt Bike Fall Riding on Wet Leaves: Grip, Hidden Obstacles and Braking
LEARN MORE
Electric Dirt Bike Trailside Power Loss: Recovery Plan When the Battery Is Dead
LEARN MORE